


Knowledge Base
go directly to the main content
Manually cascading the FRITZ!Repeater with a Mesh Repeater via Wi-Fi
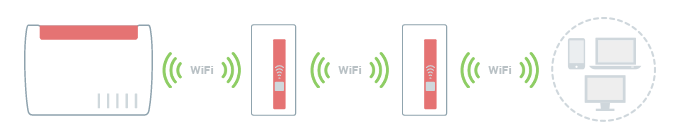
You want to connect a FRITZ!Repeater to an existing FRITZ!Repeater via Wi-Fi? ✔ Find out how to cascade them here.
In the FRITZ! Mesh, your Mesh Repeaters connect to each other automatically, or to the Mesh Master (FRITZ!Box or FRITZ!Repeater) via intelligent networking. Here the Mesh Repeaters automatically choose the fastest possible connection. If you prefer to set up cascading manually, you can disable intelligent networking in the Mesh Master and thus force your Mesh Repeaters to cascade. We recommend connecting the FRITZ!Repeater to the FRITZ!Box and leaving intelligent networking enabled so that the FRITZ! Mesh can optimize itself dynamically.
Important:When you disable intelligent networking, this function is then no longer available in the entire Mesh. This means that your Mesh Repeaters will then no longer automatically optimize based on the continuously changing conditions in your Wi-Fi environment.
In this guide we show you how to manually connect your FRITZ!Repeater to an already existing Mesh Repeater via Wi-Fi.
Requirements / Restrictions
- The existing Mesh Repeater is connected to the Mesh Master and is marked with the Mesh symbol
 in the Mesh Overview.
Note:All instructions on configuration and settings given in this guide refer to the latest FRITZ!OS for the FRITZ!Repeater.
1 Disabling intelligent networking
- Click on 'Home Network' in the user interface of the Mesh Master.
- Click on 'Mesh' in the 'Home Network' menu.
- Click on the 'Mesh Settings' tab.
- Disable the option 'Mesh devices automatically choose the best connection (recommended)'.
- Click on 'Apply' to save the settings.
2 Determining the ideal arrangement of the Mesh Repeaters
To ensure that the data is transported quickly to the Mesh Master without bottlenecks, arrange the Mesh Repeaters in descending order in the cascade according to their respective performance features. The most powerful Mesh Repeater is connected to the Mesh Master and the least powerful Mesh Repeater is used at the end of the cascade.
The most powerful extenders are tri-band extenders (for example FRITZ!Repeater 6000, FRITZ!Box 4060). Dual-band extenders (for example FRITZ!Repeater 2400) are almost as powerful, and the least powerful extenders are single-band extenders (for example FRITZ!Repeater 600).
If the Mesh Repeater has a LAN port and your house is wired, we recommend using a network cable to establish the connection. Since connections via network cable, unlike Wi-Fi connections, are not subject to interference, data is always transported with the maximum data rate.
3 Loading the FRITZ!Repeater's factory settings
To perform the following steps, the new FRITZ!Repeater must be set to factory settings:
- Push and hold down the Connect button for at least 15 seconds.
- The status LED now indicates by alternately flashing and lighting up that the factory settings are being loaded and that the FRITZ!Repeater is being restarted. This process may take several minutes.
- The status LED flashes continuously for at least 1 minute as soon as the factory settings have finished loading.
4 Connecting the FRITZ!Repeater to the existing Mesh Repeater
During setup, it does not matter which button you push first. We recommend the following order:
- For setup, plug the new FRITZ!Repeater into an electrical socket near the existing Mesh Repeater. Now the new FRITZ!Repeater starts. During this time, the status LED flashes quickly.
- Wait about 1 minute until the new FRITZ!Repeater has started and the status LED flashes slower.
- Briefly push the Connect button on the new FRITZ!Repeater (for about 1 second) and release it again. When you release the button, the status LED starts to flash.
- Within 2 minutes: Push the Connect button on the existing Mesh Repeater for the time indicated in the table:
Mesh Repeater Connect button Duration FRITZ!Box 6860, 6690, 5690 Pro, 4060 Connect about 1 second FRITZ!Box 7690, 7682, 7632, 7630, 7590 (AX), 7530 (AX), 7520, 7510, 6890, 6670, 6660, 6591, 6590, 5690, 5630, 5590, 5530, 4690, 4630, 4050 Connect / WPS about 1 second FRITZ!Box 7490, 7430, 6490, 6430 WLAN WPS about 6 seconds FRITZ!Box 7560, 7362 SL WLAN about 6 seconds FRITZ!Box 7583, 7582, 7581, 7580, 4040, 4020, 3490 WPS about 1 second FRITZ!Repeater Connect or WPS about 1 second FRITZ!Powerline 1260(E) Connect about 1 second FRITZ!Powerline 1240E WLAN - WPS
Powerline - Securityabout 1 second FRITZ!Powerline 546E, 540E WLAN · WPS about 1 second - One or more of the new FRITZ!Repeater's signal strength LEDs remain lit as soon as the Wi-Fi connection is established.
5 Adding a FRITZ!Repeater to the Mesh by button
- Briefly push the Connect button on the new FRITZ!Repeater (for about 1 second) and release it again. When you release the button, the status LED starts to flash quickly.
- Within 2 minutes: Push the Connect button on the Mesh Master until the Connect LED (see table) lights up or starts to flash. Other LEDs may also light up or flash.
Mesh Master Connect button Connect LED FRITZ!Box 6690, 5690 Pro, 4060 Connect Connect FRITZ!Box 6860, 6825 Connect WLAN FRITZ!Box 7690, 7682, 7632, 7630, 7590 (AX), 7530 (AX), 7520, 7510, 6890, 6850, 6670, 6660, 5690, 5630, 5590, 5530, 4690, 4630, 4050 Connect / WPS Connect / WPS FRITZ!Box 6591, 6590 Connect / WPS WLAN / DECT FRITZ!Box 7490, 7430, 5491, 5490 WLAN WPS WLAN / Info FRITZ!Box 6490, 6430 WLAN WPS WLAN / DECT FRITZ!Box 7560, 7362 SL WLAN WLAN / DECT FRITZ!Box 7583, 7582, 7581, 7580 WPS WLAN / Info FRITZ!Box 6820, 4040, 4020, 3490 WPS WLAN FRITZ!Mesh Set 4200, 2700, 1700, 1600 Connect Connect FRITZ!Repeater 3000 AX, 2700, 1700, 1610 Connect Connect - The FRITZ!Repeater is fully integrated into the Mesh about 5 seconds after one or more signal strength LEDs on the new FRITZ!Repeater remain lit.
6 Finding the ideal location for the FRITZ!Repeater
To extend the range as much as possible, the new FRITZ!Repeater requires a fast and stable Wi-Fi connection to the existing Mesh Repeater:
- Position the FRITZ!Repeater so that at least three of its five signal strength LEDs light up. You can find tips on positioning it in the guide Finding the ideal location for FRITZ!Repeater.
 Deutschland
 International (English)
 United Kingdom
 Österreich
 Nederland
 España
 Italia
 Polska
 België (Nederlands)
 Luxemburg (Deutsch)
 Schweiz (Deutsch)