Knowledge Base
go directly to the main content
- FRITZ!Box 7690
- FRITZ!Box 7682
- FRITZ!Box 7590 AX
- FRITZ!Box 7590
- FRITZ!Box 7583 VDSL
- FRITZ!Box 7583
- FRITZ!Box 7582
- FRITZ!Box 7581
- FRITZ!Box 7560
- FRITZ!Box 7530 AX
- FRITZ!Box 7530
- FRITZ!Box 7520
- FRITZ!Box 7510
- FRITZ!Box 7490
- FRITZ!Box 7430
- FRITZ!Box 7390
- FRITZ!Box 7360
- FRITZ!Box 6890 LTE
- FRITZ!Box 6850 5G
- FRITZ!Box 6850 LTE
Configuring internet phone numbers in FRITZ!Box
You can configure up to 20 internet phone numbers (also called VoIP or SIP phone numbers) for making calls via the internet connection. The FRITZ!Box also allows you to configure SIP trunking and SIP DDI lines.
If you received a FRITZ!Box from your cable provider, the phone numbers are often automatically configured in the FRITZ!Box. Then you may not be able to edit or add additional phone numbers in the FRITZ!Box later. In this case, refer to your cable provider for further information on your phone numbers.
If you are using your FRITZ!Box in Germany, use the guide that applies to your cable provider linked in Setting up the FRITZ!Box: Guides for different providers. If your cable provider is not listed, use this guide.
Requirements / Restrictions
- It is not possible to configure a SIP trunk from Vodafone because the FRITZ!Box only supports the operating mode 'Registered Mode'. 'Static Mode' is not supported.
1 Entering your location information
- Click on 'Telephony' in the FRITZ!Box user interface.
- Click on 'Phone Numbers' in the 'Telephony' menu.
- Click on the 'Line Settings' tab. If the tab is not displayed, the correct location information is automatically entered by your provider.
- Select your country from the drop-down list under 'Location Information'. If your country is not listed, select 'Other country'.
- For the 'Country code', enter the leading zeros in the first field and the country code in the second field (for example, enter '00' and '49' for Germany).
- For the 'Area code', enter the leading zero in the first field and the area code in the second field (for example '0' and '30' for Berlin).
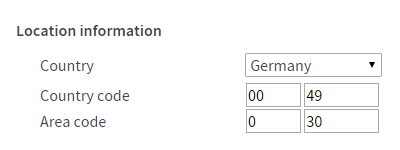
Fig.: Entering the country code and area code (e.g. for Germany and Berlin)
- Click on 'Apply' to save the settings. On the FRITZ!Box, confirm that the procedure may be executed, if you are asked to do so.
2 Configuring internet phone numbers
Configuring an internet phone number (standard)
- Click on 'Telephony' in the FRITZ!Box user interface.
- Click on 'Phone Numbers' in the 'Telephony' menu.
- Click on the 'New Phone Number' button.
- Select your provider from the drop-down list. If your provider is not listed, select 'Other provider' or 'Anderer Kabelanbieter' if you want to configure a phone number from a cable provider.
- Enter the internet number (phone number) and the account information (for example username, password, registrar) in the corresponding fields. This information is supplied by your provider.
- If the 'Relay outgoing emergency calls without prefixes' option is displayed, ask your provider whether calls to emergency numbers must be made with or without prefixes. Select the correct setting.
- If the 'Relay special rate numbers without prefixes' option is displayed, ask your provider if calls to special rate numbers must be made with or without prefixes. Select the correct setting.
- If present, enable the 'Insert area code for outgoing calls' option. The area code is then automatically added when you make local calls over the internet, so you do not have to enter it.
- Click on 'Next' and follow the wizard's instructions.
Configuring an internet phone number (SIP trunk)
If you ordered a SIP trunk from your provider, configure it as follows:
Important:SIP trunking from Deutsche Telekom, for example the package 'Deutschland LAN SIP-Trunk Pooling', must be configured as described in this guide.
- Click on 'Telephony' in the FRITZ!Box user interface.
- Click on 'Phone Numbers' in the 'Telephony' menu.
- Click on the 'New Phone Number' button.
- Select your SIP trunk provider from the drop-down list. If your provider is not listed, select 'SIP trunking with various phone numbers'.
- Enter all phone numbers of the SIP trunk provider that you want to assign to telephony devices connected to the FRITZ!Box. If you need additional fields, click 'Other Phone Numbers'.
- Enter the account information (for example username, password, registrar) in the corresponding fields. This information is supplied by your provider.
- If the 'Relay outgoing emergency calls without prefixes' option is displayed, ask your provider whether calls to emergency numbers must be made with or without prefixes. Select the correct setting.
- If the 'Relay special rate numbers without prefixes' option is displayed, ask your provider if calls to special rate numbers must be made with or without prefixes. Select the correct setting.
- If present, enable the 'Insert area code for outgoing calls' option. The area code is then automatically added when you make local calls over the internet, so you do not have to enter it.
- Click on 'Next' and follow the wizard's instructions.
Configuring an internet phone number (SIP trunk line)
If you ordered a SIP trunk line from your provider, configure it as follows:
- Click on 'Telephony' in the FRITZ!Box user interface.
- Click on 'Phone Numbers' in the 'Telephony' menu.
- Click on the 'New Phone Number' button.
- Select 'SIP DDI line' from the drop-down list.
- Enter the trunk number of your SIP trunk line.
- Enter the switchboard extension.
- Select the length of the longest internal extension number from the drop-down list.
- Enter all of the extension numbers (trunk number plus extension) you want to assign the telephony devices connected to the FRITZ!Box. If you need additional fields, click 'Other Phone Numbers'.
- Enter the account information (for example username, password, registrar) in the corresponding fields. This information is supplied by your provider.
- If the 'Relay outgoing emergency calls without prefixes' option is displayed, ask your provider whether calls to emergency numbers must be made with or without prefixes. Select the correct setting.
- If the 'Relay special rate numbers without prefixes' option is displayed, ask your provider if calls to special rate numbers must be made with or without prefixes. Select the correct setting.
- If present, enable the 'Insert area code for outgoing calls' option. The area code is then automatically added when you make local calls over the internet, so you do not have to enter it.
- Click on 'Next' and follow the wizard's instructions.
3 Adjusting the login information for 'Other provider'
If you selected 'Other provider' in the configuration wizard and the phone number does not get registered after setup, you may have to edit the login information. If you select a preconfigured internet telephony provider, the FRITZ!Box configures the correct settings automatically:
Using own phone number for registration
- Click on 'Telephony' in the FRITZ!Box user interface.
- Click on 'Phone Numbers' in the 'Telephony' menu.
- Click on the
 (Edit) button for the respective internet phone number.
 - Enable or disable the 'Use phone number for registration' option. Whether you must enable the option depends on the provider. Try both settings or ask your provider. There is no standard name for this parameter. Its technical acronym is 'SIP URI'.
- Click on 'Apply' to save the settings.
Using REGISTER-fetch
- Click on 'Telephony' in the FRITZ!Box user interface.
- Click on 'Phone Numbers' in the 'Telephony' menu.
- Click on the (Edit) button for the respective internet phone number.
- Enable or disable the 'Provider does not support REGISTER-fetch' option. Whether you must enable the option depends on the provider. Try both settings or ask your provider.
- Click on 'Apply' to save the settings.
4 Enabling registration via an internet connection
Some internet service providers establish a second internet connection for internet telephony; this connection can only use the internet service provider's numbers. Therefore, enable the following option if you are using an internet phone number that is not from your internet service provider. The FRITZ!Box will then use the same connection you surf with for this phone number:
- Click on 'Telephony' in the FRITZ!Box user interface.
- Click on 'Phone Numbers' in the 'Telephony' menu.
- Click on the (Edit) button for the respective internet phone number.
- Enable the 'Always register via an internet connection' option.
- Click on 'Apply' to save the settings.